You have no items in your shopping basket.
Swipe to the left
How to knit: Intarsia knitting with several colours
Print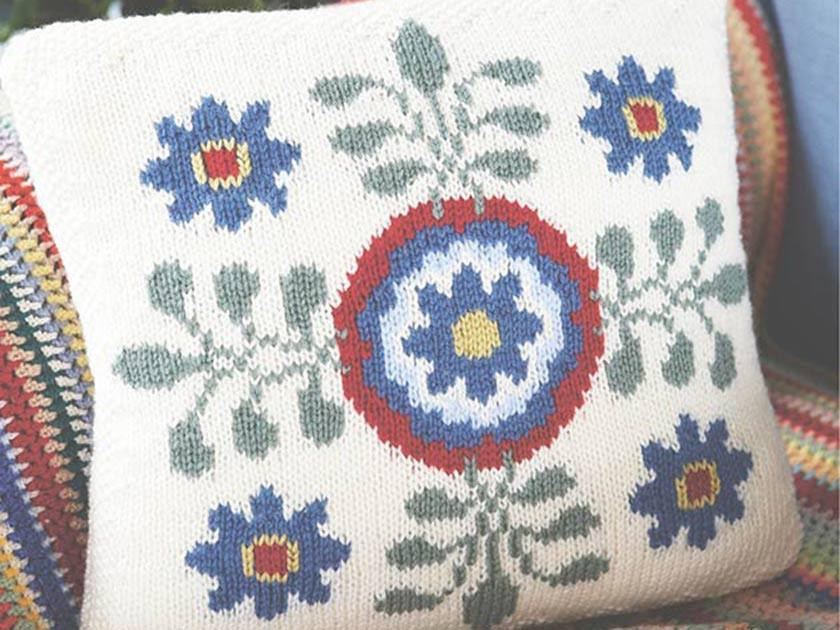
By Beth Shearing
7 years ago
Knitting with colour creates a wonderful effect but getting an even neat appearance can be a challenge.
What is intarsia?
Intarsia is a technique used when working with blocks of colour, so that you don’t have to carry the yarn across the back of the work. To do this you need to have separate small balls of yarn for each colour block.
Working intarsia
The first thing that will make your life easier is taking the time to choose how to organise your yarns. Patterns with lots of colours on-the-go at the same time will make working with full balls troublesome as they will be inclined to tangle as you work some strategic twisting with this method.
1. Work with your first colour to the point where you need to change.
2. Pick up your second colour and take the first colour under the second colour on the wrong side of the work, thus twisting them together.

3. Continue with the second colour to the point where you need to change colour again or to the end of the row.
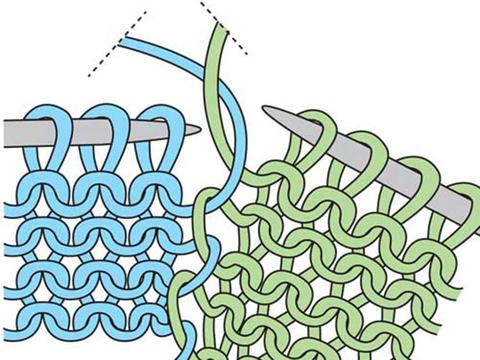
4. Continue in this way twisting your colours every time you change thus avoiding making holes.
Tip: Some smaller areas may be simpler to Swiss darn afterwards.
This method is easy to use when working large geometrical patterns. It becomes a little challenging when you need to change colours on irregular shapes. The same technique applies, although you may need to carry your yarn over a number of stitches to reach the next changing point. By doing so, ensure that the strand is not pulled to tightly as this would create a puckered fabric.
How to make intarsia bobbins
1. Measure how much yarn you need to wind for a patch of colour by counting the number of squares it occupies on your intarsia chart from your knitting pattern. Leaving 10cm each end, wrap your yarn loosely around the recommended knitting needle for the same pattern once for each square counted without overlapping and cut.
Wrap your yarn around your thumb and index finger of your left hand in a figure-of-eight motion, leaving the end of your yarn hanging in your palm as shown, below.
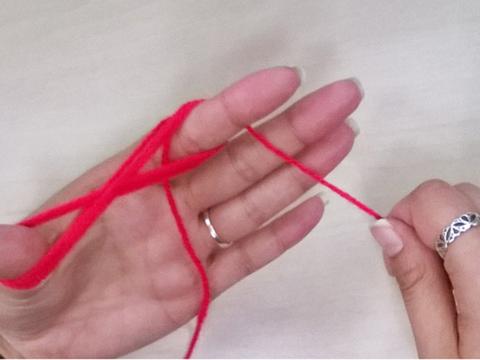
2. Stop winding when you have 12in (30cm) remaining and carefully remove the figure-of-eight shape from your left hand so that it keeps its shape, leaving the end hanging. Wrap your cut end of yarn tightly around the middle of the bobbin making sure the starting end remains hanging, stop when you have 10cm (4in) remaining.

3. Wrap the 10cm (4in) end of yarn once more around the bobbin loosely, and thread it underneath the loose loop before tightening to fasten. Trim this end.

To use, simply tug gently at the starting end to obtain more yarn as and when needed. Don’t pull too much, keep the bobbin hanging close to the work to prevent any tangles. Once you have pulled out the yarn you need, you can’t put it back until it’s knitted in, so be gentle.
If you'd like to have a go at intarsia, get to work on one of our fabulous knitting patterns now. Our Floral Intarsia Cushion Cover is ideal for beginners looking for a challenge.
Posted in: News